1 kg of fresh apricots
1 1/3 cups of granulated suga
1/4 cup water
2 Tbsp freshly squeezed lemon juice
Equipment:
a heavy bottomed non-reactive pan (an enameled cast-iron pan is ideal, or a heavy stainless steel pan. Don't use aluminum or uncoated cast-iron.)
canning jars with rubber-seal jar lids.
Melt the sugar and water in the pan. Bring to a boil, then simmer until clear and slightly syrupy. (Watch the pot at this stage or you might end up with a potful of hard crystallized sugar!)
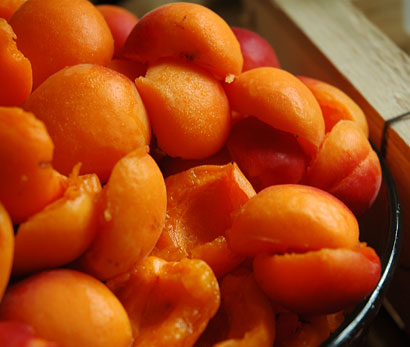
Carefully sort and wash the apricots. Halve them and discard the pits, making sure to get rid of the stem end. (To halve them I just rip them apart with my fingers - far easier than cutting them with a knife.)
Optionally, crack open a few of the pits (just a few, no more than a small handful) with a nutcracker or hammer (wrap them in a cloth and smash), wrap them in some cheesecloth and put in the pot. This imparts an intriguing almond flavor to the preserves.
Put about half of the apricots in the sugar syrup and simmer until the fruit is almost falling apart. Put in the rest of the apricots and continue simmering until they are almost falling apart, but not quite. The whole procedure will take about an hour or more, depending on how soft your apricots were to start with.
Add the lemon juice and stir. Simmer an additional 5 minutes, then take off the heat. Take out the cheesecloth with the pits if you put them in.
(If the jam gets burned on the bottom at any point, just pour out the unburned jam into a fresh pot and continue cooking. Don't scrape the burned bits into the new pot!)
Preparing the jars and lids
While
you are simmering the preserves, sterilize the jars and lids. There are
a couple of ways of doing this. If your dishwasher can sterilize baby
bottles, you can use that setting for the jars and lids. Otherwise use
one of the following methods:
- The traditional boiling pot of water: Bring a big pot of water to a boil, and lower the jars into it, immersing them completely. Follow up with the lids. Boil for a few minutes to sterilize. Take them out with clean tongs.
- The low oven method: Put the washed jars and lids into an oven heated to about 230*F. "Bake" the jars for about 20 minutes, or until the water on them is totally dried out. Take them out carefully using tongs and/or a clean oven mitt.
Filling the jars
(When you are handling the sterilized jars and lids, at no point should you touch the jars inside or on the rims, or inside the lids, as your hands are not sterile.)
To
fill the jars, fill them up to the very rim with the boiling hot
preserves, then immediately screw on a lid. Don't worry if some of the
liquid spills - and whatever you do, don't try to wipe the rim.
Now, leave the jars until you hear and see the lids "popping" - they
should be indented. That's the indication that they are
vacuum-sealed.Once the jars are cool, wipe off any dribbles outside the jar with a damp cloth, and store in a cool, dark place. Remember that an opened jar must be stored in the refrigerator.
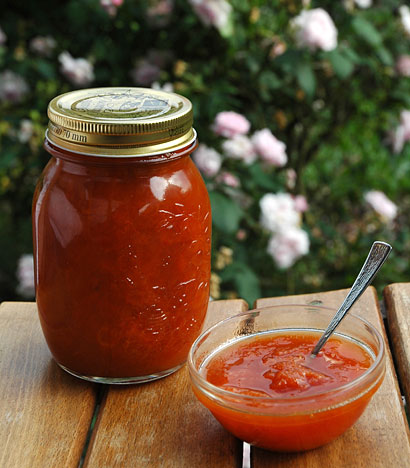
This will make about 2 small jars of preserves.
No comments:
Post a Comment